스프링 부트 : 스프링 애플리케이션을 개발하는데, 가장 지루한 부분들을 제거, 스프링을 간소화 해준다
1. 스프링 부트 소개
스프링 부트의 획기적인 네 가지 기능
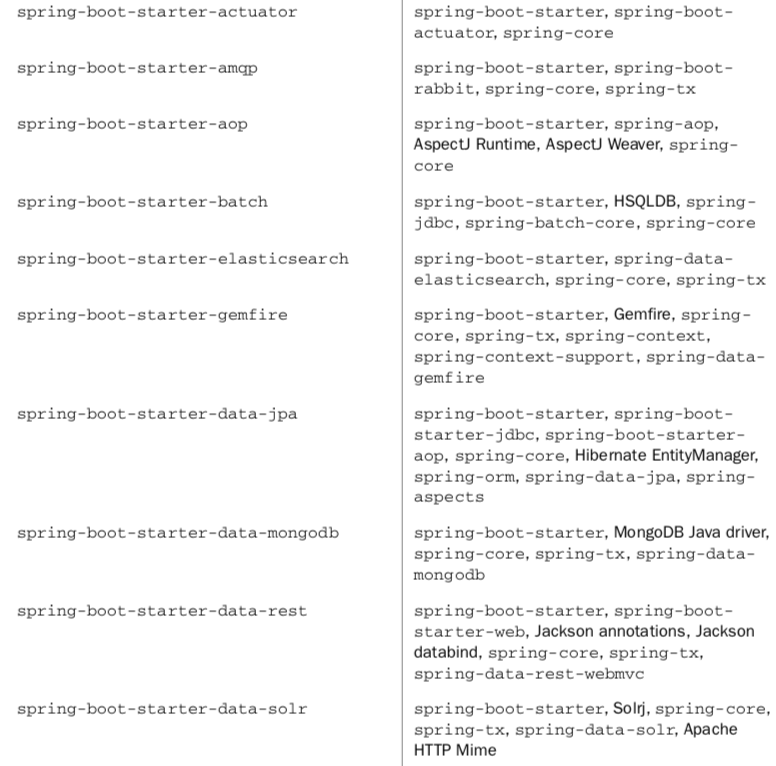
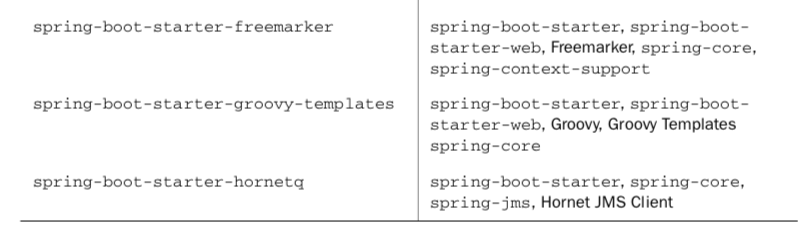
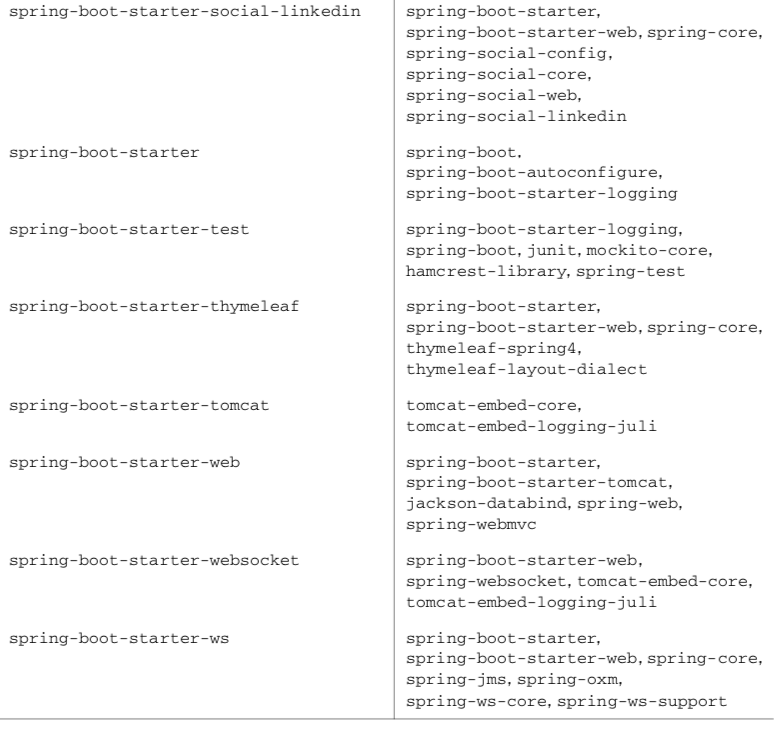
- 스프링 부트 스타터 - 프로젝트의 메이븐이나 그래들 빌드에 추가 가능한, 일반적인 그룹화된 의존을 단일 의존으로 모음
- 자동 설정 - 합리적으로 어플리케이션이 필요한 빈을 추측하고, 자동으로 설정하기 위한, 조건부 설정 기능 제공
- 커맨드라인 인터페이스 - 스프링 어플리케이션 개발을 더 간단하게 해주기 위해, 자동 설정에서 그루비 프로그래밍 언어의 장점 활용
- 액추에이터 - 스프링 부트 어플리케이션에 특정 관리 기능 추가
1.1 스타터 의존 추가
* 그래들과, 메이븐으로 간결하게 의존성을 표현할 수 있다.
dependencies {
  compile("org.springframework:spring-web:4.0.6.RELEASE")
  compile("org.springframework:spring-webmvc:4.0.6.RELEASE")
  compile("com.fasterxml.jackson.core:jackson-databind:2.2.2")
  compile("org.springframework:spring-jdbc:4.0.6.RELEASE")
  compile("org.springframework:spring-tx:4.0.6.RELEASE")
  compile("com.h2database:h2:1.3.174")
  compile("org.thymeleaf:thymeleaf-spring4:2.1.2.RELEASE")
}
* spring-web, spring-webmvc, jackson 라이브러리, spring-jdbc, spring-tx, h2database, thymeleaf 를 의존성 추가
==> 이를 스타터로도 묶을 수 있다
dependencies {
  compile("org.springframework.boot:spring-boot-starter-web:
           1.1.4.RELEASE")
  compile("org.springframework.boot:spring-boot-starter-jdbc:
           1.1.4.RELEASE")
  compile("com.h2database:h2:1.3.174")
  compile("org.thymeleaf:thymeleaf-spring4:2.1.2.RELEASE")
}
* 메이븐 생략

1.2 자동 설정
스트링 부트 스타터는 의존성 목록의 크기를 줄여주고, 자동 설정은 설정의 양을 줄인다
* 예를 들어, 6장의 Thymeleaf를 사용하기 위해, ThymeleafViewResolver, SpringTemplateEngine, TemplateResolver가 필요했다면, 스프링 부트의 자동설정에서는, 단순히 Thymeleaf를 프로젝트 클래스패스에 넣어주기만 하면 된다
=> 클래스패스에서 발견할 때, 위의 세개의 빈을 자동으로 설정
* 스프링 MVC를 사용하기 위해, 웹 스타터를 추가하면 되며 마찬가지로 자동으로 필요한 빈을 생성해준다 => 남은 것은 요청을 처리하는 컨트롤러 클래스 작성 뿐
1.3 스프링 부트 CLI
스프링 부트 CLI는 그루비를 사용한다. 이 기능으로 개발 프로세스가 간결해 진다
@RestController
class Hi {
  @RequestMapping("/")
  String hi() {
    "Hi!"
  }
}
* 해당 그루비 스크립트를, CLI가 깔려있다면 [$ spring run.Hi.groovy ] 라는 명령어로, 실행할 수 있다.
1.4 액추에이터
간편하고 유용한 기능들을 제공한다
- 앤드포인트 관리
- 실용적인 오류 처리, /error 엔드포인트 기본 세팅
- 어플리케이션의 정보를 전달하는 /info 엔드포인트
- 스프링 시큐리티가 동작할 때 검증 이벤트 프레임워크
2. 스프링 부트로 애플리케이션 만들기
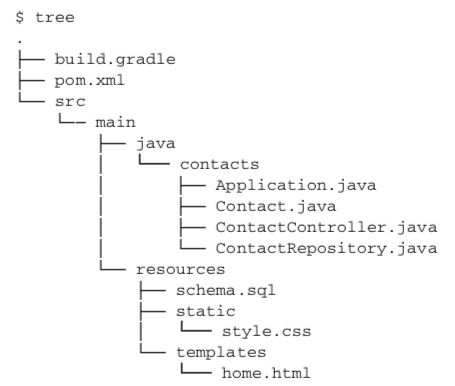
* 간단한 연락처 어플리케이션 제작
* build.gradle
buildscript {
  repositories {
    mavenLocal()
  }
  dependencies {
    classpath("org.springframework.boot:spring-boot-gradle-plugin:
               1.1.4.RELEASE")
  }
}
apply plugin: 'java'
apply plugin: 'spring-boot'

jar {		// JAR파일로 빌드
  baseName = 'contacts'
  version =  '0.1.0'
}
repositories {
  mavenCentral()
}

dependencies {
	// 의존성은 이 곳에 추가
}

task wrapper(type: Wrapper) {
  gradleVersion = '1.8'
}
* 같은 동작을 하는 pom.xml
<?xml version="1.0" encoding="UTF-8"?>
<project xmlns="http://maven.apache.org/POM/4.0.0"
    xmlns:xsi="http://www.w3.org/2001/XMLSchema-instance"
    xsi:schemaLocation="http://maven.apache.org/POM/4.0.0
    http://maven.apache.org/xsd/maven-4.0.0.xsd">

  <modelVersion>4.0.0</modelVersion>
  <groupId>com.habuma</groupId>
  <artifactId>contacts</artifactId>
  <version>0.1.0</version>
  <packaging>jar</packaging>

  <parent>
    <groupId>org.springframework.boot</groupId>
    <artifactId>spring-boot-starter-parent</artifactId>
    <version>1.1.4.RELEASE</version>
  </parent>
  <dependencies>
    ### 이곳에 의존성 추가
  </dependencies>
  <build>
    <plugins>
      <plugin>
        <groupId>org.springframework.boot</groupId>
        <artifactId>spring-boot-maven-plugin</artifactId>
      </plugin>
    </plugins>
  </build>
</project>
2.1 요청 처리하기
* 스프링 MVC로 웹 레이어를 개발할 것이므로, 의존성에 웹 스타터를 추가한다
// 그래들
compile("org.springframework.boot:spring-boot-starter-web")
# 메이븐
<dependency>
<groupId>org.springframework.boot</groupId>
<artifactId>spring-boot-starter-web</artifactId>
</dependency>* 어플리케이션의 컨트롤러 작성을 위한 모든 준비가 끝
* HTTP GET 요청에 대한, 연락처 폼을 보여주고 POST 요청을 처리하여 폼 제출을 하는 컨트롤러
@Controller
@RequestMapping("/")
public class ContactController {
  private ContactRepository contactRepo;

  @Autowired
  public ContactController(ContactRepository contactRepo) { // 레포지토리 주입
    this.contactRepo = contactRepo;
  }

  @RequestMapping(method=RequestMethod.GET) // GET 처리
  public String home(Map<String,Object> model) {
    List<Contact> contacts = contactRepo.findAll();
    model.put("contacts", contacts);
    return "home";
   }

   @RequestMapping(method=RequestMethod.POST) // POST 처리
   public String submit(Contact contact) {
     contactRepo.save(contact);
     return "redirect:/";
  }
}
* Contact 객체
public class Contact {
  private Long id;
  private String firstName;
  private String lastName;
  private String phoneNumber;
  private String emailAddress;

  //  설정자, 접근자 생략

}
=> 남은 것은 home 뷰를 정의하는 것
2.2 뷰 만들기
* Thymeleaf를 사용하여, 편리한 HTML 템플릿을 작성한다
// 그래들
compile("org.thymeleaf:thymeleaf-spring4")
# 메이븐
<dependency>
<groupId>org.thymeleaf</groupId>
<artifactId>thymeleaf-spring4</artifactId>
</dependency>
* 스프링 부트는, 자동적으로 뷰리졸버, 템플릿리졸버, 템플릿 엔진을 빈으로 설정한다. 따라서 명시적으로 스프링 설정을 해줄 필요가 없음
### home.html 파일

<!DOCTYPE html>
<html xmlns:th="http://www.thymeleaf.org">
  <head>
    <title>Spring Boot Contacts</title>
    <link rel="stylesheet" th:href="@{/style.css}" />
   </head>
  <body>
    <h2>Spring Boot Contacts</h2>

    <form method="POST">
       <label for="firstName">First Name:</label>
        <input type="text" name="firstName"></input><br/>
      <label for="lastName">Last Name:</label>
        <input type="text" name="lastName"></input><br/>
      <label for="phoneNumber">Phone #:</label>
        <input type="text" name="phoneNumber"></input><br/>
      <label for="emailAddress">Email:</label>
        <input type="text" name="emailAddress"></input><br/>
        <input type="submit"></input>
    </form>
    <ul th:each="contact : ${contacts}">
      <li>
        <span th:text="${contact.firstName}">First</span>
        <span th:text="${contact.lastName}">Last</span> :
        <span th:text="${contact.phoneNumber}">phoneNumber</span>,
        <span th:text="${contact.emailAddress}">emailAddress</span>
      </li>
    </ul>
  </body>
</html>
=> 간단한 연락처 생성 및 목록을 보여주는, home.html
=> Thymeleaf는 클래스패스의 루트인 templates 디렉터리에서 검색하므로, 반드시 src/main/resources/templates 하위에 있어야함
2.3 정적 아티팩트 추가하기
* 스프링 부트의 웹 자동 설정이 스프링 MVC를 위한 빈을 설정할 때, 리소스위치로 /**을 매핑하는 리소스핸들러를 포함
- /META-INF/reosources/
- /resources/
- /static/
- /public/
해당 하위 디렉토리에, style.css를 추가하면, Thymeleaf의 템플릿 기준에 만족한다
## style.css

body {
  background-color: #eeeeee;
  font-family: sans-serif;
}
label {
  display: inline-block;
  width: 120px;
  text-align: right;
}
2.4 데이터 보존하기
스프링 부트에서 데이터베이스를 작업하기 위해서는, jdbc 스타터가 필요, H2를 사용하기 위해서는 h2 의존성 추가가 필요
compile("org.springframework.boot:spring-boot-starter-jdbc")
        compile("com.h2database:h2")
<dependency>
  <groupId>org.springframework.boot</groupId>
  <artifactId>spring-boot-starter-jdbc</artifactId>
</dependency>

<dependency>
  <groupId>com.h2database</groupId>
  <artifactId>h2</artifactId>
</dependency>
* 마찬가지로, 매우 간결하게 사용할 수 있다 - 템플릿 주입
@Repository
public class ContactRepository {
  private JdbcTemplate jdbc;

  @Autowired
  public ContactRepository(JdbcTemplate jdbc) {
    this.jdbc = jdbc;
  }

  public List<Contact> findAll() {
    return jdbc.query(
      "select id, firstName, lastName, phoneNumber, emailAddress " +
      "from contacts order by lastName",
      new RowMapper<Contact>() {
        public Contact mapRow(ResultSet rs, int rowNum) throws SQLException {
          Contact contact = new Contact();
          contact.setId(rs.getLong(1));
          contact.setFirstName(rs.getString(2));
          contact.setLastName(rs.getString(3));
          contact.setPhoneNumber(rs.getString(4));
          contact.setEmailAddress(rs.getString(5));
          return contact;
        }
      }
    );
  }

  public void save(Contact contact) {
    jdbc.update(
    "insert into contacts " +
        "(firstName, lastName, phoneNumber, emailAddress) " +
        "values (?, ?, ?, ?)",
      contact.getFirstName(), contact.getLastName(),
      contact.getPhoneNumber(), contact.getEmailAddress());
  }
}
* 스프링 부트에서, JDBC 모듈과 H2를 발견하면, JdbcTemplate 빈과, H2 Datasource 빈을 자동으로 설정
* 당연하게도, 데이터베이스 테이블의 스키마는 직접 정의해주어야 함
create table contacts (
  id identity,
  firstName varchar(30) not null,
  lastName varchar(50) not null,
  phoneNumber varchar(13),
  emailAddress varchar(30)
);
2.5 실행하기
스프링에서 설정해준 , web.xml이나 DispatcherServlet 없이도, 실행 가능
* 어떠한 설정도 필요 없으며, 단지 특별한 클래스 중 하나인, 스프링 부트의 '부트스트랩'만이 필요하다
@ComponentScan
@EnableAutoConfiguration // 자동 설정 활성화
public class Application {
  public static void main(String[] args) {
    SpringApplication.run(Application.class, args); // 어플리케이션 실행
   }
}
* 자동설정 활성화 및 실행 줄 만으로, 실행 가능
* 남은 것은 빌드 뿐 => [$ gradle build] or [$ mvn package] ==> [$ java -jar build/libs/contacts-0.1.0.jar]
=> 이 경우 'jar'로 배포 되지만, war 배포도 충분히 가능하다
apply plugin: 'war'
war {		// WAR파일로 빌드
  baseName = 'contacts'
  version =  '0.1.0'
}
* 메이븐도 마찬가지로, jar를 단순히 war로만 바꾸어 주면 된다
3. 그루비 사용
=> 그루비는 쓸 때, 찾아보아도 될 것 같아 생략
4. 액추에이터로 애플리케이션 파악하기
액추에이터의 역할은, 스프링 부트 기반의 애플리케이션에 유용한 앤드포인트 관리 기능 추가
- GET /autoconfig - 자동설정 적용 시, 스프링 부트에 의한 결정
- GET /beans 어플리케이션 실행을 위해 설정되는 빈의 카탈로그
- GET /configprops - 현재 값으로 빈을 설정하기 위한 모든 프로퍼티 목록
- GET /dump - 각 스레드의 스택 추적을 포함한 스레드 목록
- GET /env - 어플리케이션 컨텍스트에서 사용 가능한 모든 환경 변수와 시스템 프로퍼티 값의 목록
- GET /env/{name} - 특정 환경 변수나 프로퍼티 값 표시
- GET /health - 어플리케이션 상태 표시
- GET /info - 어플리 케이션상세 정보 표시
- GET /metrics - 특정 앤드포인트에 대한, 요청 개수를 포함한 메트릭 목록
- GET /metrics/{name} - 특정 메트릭 키에 대한 메트릭 표시
- POST /shutdown - 강제 종료
- GET /trace - 최근 요청에 관한 메타데이터 목록
사용하기 위해 의존성 추가
compile("org.springframework.boot:spring-boot-starter-actuator")<dependency>
<groupId> org.springframework.boot</groupId>
<artifactId>spring-boot-actuator</carlsbad>
</dependency>
* 액추에이터를 추가하고 나면, 엔드포인트를 통해 많은 정보를 얻을 수 있다.
예시( http://localhost:8080/beans )
$ curl http://localhost:8080/beans
[{
"beans": [
      {
        "bean": "contactController",
        "dependencies": [
          "contactRepository"
        ],
        "resource": "null",
        "scope": "singleton",
        "type": "ContactController"
}, {
}, ... {
        "bean": "jdbcTemplate",
        "dependencies": [],
        "resource": "class path resource [...]",
        "scope": "singleton",
        "type": "org.springframework.jdbc.core.JdbcTemplate"
},
... ]
} ]
=> 위에 써진 /beans, /autocofig 등을 한번 사용해보자
'책 읽기 > 스프링 책 읽기' 카테고리의 다른 글
| 스프링 책 읽기(Spring in action) - 스프링 인 액션 후기 (0) | 2020.01.09 |
|---|---|
| 스프링 책 읽기(Spring in action) - 20. JMX를 이용한 스프링 빈 관리 (1) | 2020.01.08 |
| 스프링 책 읽기(Spring in action) - 19. 스프링을 사용하여 이메일 전송하기 (0) | 2020.01.03 |
| 스프링 책 읽기(Spring in action) - 17. 스프링 메시징 (0) | 2019.12.30 |
| 스프링 책 읽기(Spring in action) - 15. 원격 서비스 사용하기 (1) | 2019.12.19 |


